9 Mayıs 2021 Pazar

Alpha Selection kaydı 3

 This tutorial was done with Paint Shop Pro X8

İtalyanca orijinal ders > Burada

 Pointer Tool     Tool Select


THE SELECTIONS

In this tutorial I'll explain how to save the selection

 on Alpha channel, only to find it again, and be able to use it again.

To do this, we need to open, on psp,

two canvases of equal size, one will be called the Alpha Channel and will be the canvas where you will save your selections

and the other will be the canvas of your work.

Position yourself on the canvas of your work and pull a selection with the Selections tool,

which can also be done with a lasso, the shape does not matter, as long as it is in the right place

where you want it to be to be able to create your work,

when you open the alpha channel canvas, you will find it in the same place you saved it.

I have created this square as an example, you create a selection as you like

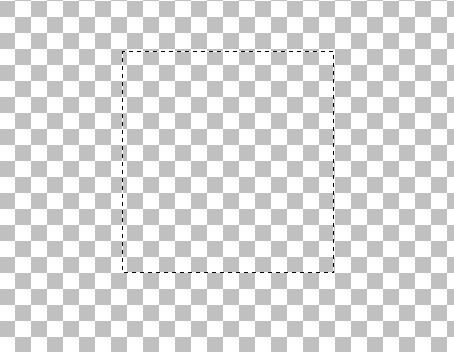
Now you have to save it.

go to the menu Selections - Save selections on alpha channel, a window will open

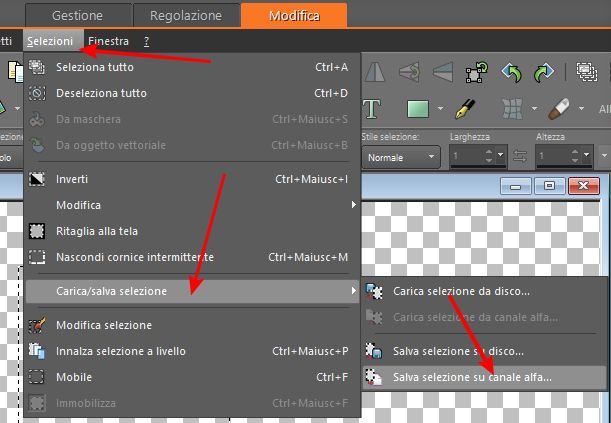
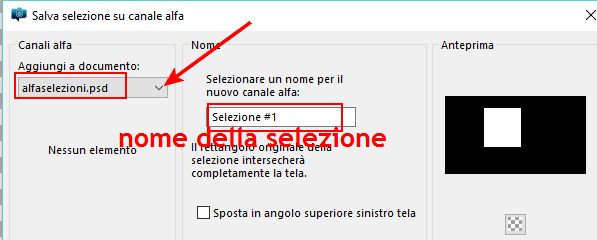
choose the canvas you called it Alpha-selections, name your selection and save.


 you can color your selection to your liking and continue your work as you like.

When your work is done and you have also saved all your selections

save your work in the format you prefer, also save the Alpha-selections file in psd or psp format .

The Alpha-Selections canvas will be white but will not be empty

 because it will contain your selections that you can use

whenever you feel like it.

Another way to save your selections is to save them to disk, they are saved in psp files, but

in this course we will use those saved on alpha channel.

Bye Mikela

11 Ağustos 2020 Salı

Happy New Year


Happy New Year


Bu öğretici psparena.com için, Psp x9 ile hazırlanmıştır ancak diğer versiyonlarla da yapılabilir.
Telif hakkına sahiptir, başka site, forum ve gruplarda izinsiz yayınlanamaz.

Kullanılan pluginler:
Alien Skin Eye candy 5-İmpact > Backlight
Alien Skin Eye Candy 5-İmpact > Perspective Shadow
Extravaganza-Transmision
Extravaganze-  Vasarely
Malzeme dosyasında  bulunanlar:
1 Snow man
1 Kar manzara
1 Deko star
1 Text_HNY
1 Mask
1 Gradient
1 Renk paleti
Hazırlık: Malzeme dosyasındaki gradienti My Psp Files içindeki Gradients klasörünün içine yapıştırın.
Aşağıya tıklayarak malzemeleri indirin
Alternatif indirme bağlantısı
Not: Kullandığınız tube ve renklere göre blend mode , opacity ve resize değerlerini değiştirebilirsiniz.
Benim renklerim:
#ffffff         #25146e #000000

  Tutorial:

1-File-New-New İmage
850 x 500 px. Transparent bir çalışma alanı açın
2- Flood Fill Tool ile  çalışma alanının içini siyah ile #000000 doldurun.
3-Layers-New Raster Layer
4-Renk paletini açın.
#ffffff         #25146e #000000
Önplan ( foreground) ve arkaplan (background) renklerini hazırlayın.
Foreground (önplan) rengi: #25146e
Background (arkaplan) rengi:   #000000
5-Material Properties  > Gradient > Witte knop> Rectangular stili gradient hazırlayın.
Angle: 45, Repeats: 0
İnvert: İşaretli değil
Center Point > Horizontal:1, Vertical: 100
Flood Fill Tool  ile çalışma alanını doldurun.
6-Layers- Duplicate
İmage-Mirror
İmage-Flip
7- Layers- Merge-Merge down
8-Effects-İmage Effect- Seamless Tiling
9-Layers-Duplicate
İmage-Mirror
10-Layers-Merge-Merge down
11-Layers- New Raster  layer
12-Selections- Custom selection
Seçili alanın içini Foreground rengi #25146e ile  doldurun.
13-Selections- Modify-Contract 50 px.
14-Material Properties  > Gradient > Foreground- Background >Linear  stil bir gradient hazırlayın.
Angle: 45, Repeats: 10
İnvert: İşaretli
Flood Fill Tool ile  seçili alanın içini doldurun.
Selections- Select none
15-Layers-Duplicate
İmage-mirror
Layers Properties > Blend mode: Screen
16-Layers-Merge-Merge down
17-Layers-Duplicate
18-Effects-Plugıns> Alien Skin Eye candy 5-İmpact >Backlight
Settings > Outline, Foggy
19-Layers-Arrange- Move down
Layers Properties > Opacity: 35
20- En üst layeri ( Raster 3 ) aktive edin.
21-Effects-Plugıns >  Alien Skin Eye candy 5 > Perspective shadow
Settings: Drop shadow,High
22-İmage-Resize  % 85
(Resize all layers: işaretli değil)
23-Raster 2 adlı layeri aktive edin
Layers-Merge-Merge down
Effects-Plugıns> VM Extravaganza > Transmission…
Layers-Duplicate
25-Effects-Plugıns > VM Extravaganza > Vasarely…
Opacity: 70
Bulunduğunuz layerde kalın
26-Layers- New Raster Layer
Flood Fill Tool ile   Beyaz  renk #ffffff doldurun
27-Mask’ı açın
Layers-New mask layer-From image
Maskı bulun ve uygulayın (OK)
28- Layers-Duplicate
Layers-Merge- Merge group
29-En üst layeri (Raster 3) aktive edin
Deco star’ı açın
Edit-Copy
Çalışmanıza dönün
Edit-Paste as new layer seçeneği ile yapıştırın
(Not: Farklı renkler kullanıyorsanız Adjust- Hue and Saturation > Colorize veya
Adjust-Hue and Saturation >Hue/Saturation/ Lightness… menüsünü kullanarak deconun rengini değiştirebilirsiniz.)
30-Effects-İmage effects-Offset
31-Blend mode: Dodge
32- Snow man’i açın
İmage-Resize  % 75
(Resize all layers: işaretli değil)
(Not: Siz yeniden boyutlandırmayı kendi ihtiyacınıza göre yapınız.)
33-Edit-Copy
Çalışmanıza dönün
Edit- Paste as new layer
34-Effects- İmage Effects- Offset
35-Effects-Plugıns > Alien Skin Eye candy 5 > Perspective shadow
Settings: Drop shadow, Low
36- Text_HNY’yi açın
Edit-Copy
Çalışmanıza dönün
Edit- Paste as new layer
37-Effects- İmage Effects> Offset
38-Layers-Duplicate
39-Raster 3 adlı layeri aktive edin.
Layers-New Raster Layer
40-Selection-Custom Selection
41-Kar manzara’yı açın
Edit-Copy
Çalışmanıza dönün
Edit-Paste into selection
Layers-Properties > Opacity: 35
42-Selections-Select none
43-İmage-Add borders 1 px. Symmetric, Renk: #ffffff
İmage-Add borders 1 px. Symmetric, Renk: #000000
İmage-Add borders 40 px. Symmetric, Renk: #ffffff
İmage-Add borders 1px. Symmetric, Renk:  #000000
44- Layers-New raster layer
İsminizi yazın ya da filigranınızı (watermarkt) ekleyin
45-Layers- Merge-Merge visible
46-Save as Jpg
Çalışmamız bitti, işte sonucumuz.
Kardan adam tube: Kisspng
Mask, manzara ve deco star: From net
Teşekkür ederim.
Bir başka versiyon:
Müşerref Özdaş
22.11.2018
Sizin versiyonlarınız:

Otomatik alternatif metin yok.
Görüntünün olası içeriği: bir veya daha fazla kişi
Görüntünün olası içeriği: 1 kişi, yazı
Mustafa Kemal